
My first article about Sitecore MCP received a very warm welcome. And probably many of you wanted to try it yourself. It is very easy. It will take less than ten minutes to start.
Prerequisites
In short, you need Sitecore + Cursor. In detail, the prerequisites are described below.
First, you need Sitecore. We need GraphQL and Sitecore Item API. GraphQL has been supported since version 9.1, and the Sitecore Item API has been supported since version 6.6. Anything newer than 9.1 should be fine. And, following our statistics, it will work with 98% of Sitecore websites.
Sitecore edition doesn’t matter. For now, we have only an API for item management, the CMS part of the platform. It will work with XM, XP, or SitecoreAI (XM Cloud).
The second prerequisite is an application and an AI agent. MCP servers are a new feature, and they are supported only by the desktop application for now. Anthropic is working on the implementation of supporting the MCP server for web-based applications, but I haven’t tried it yet, and I can’t recommend it. You can use Claude Desktop, VS Code + Copilot, or Cursor. All of them work about the same. My subjective recommendation is Cursor + Anthropic Claude 3.7. Or if you want to work with Sitecore GraphQL Schema, then Cursor + Google Gemini Pro 2.5. Subscription to Cursor starts from 20 USD per month. A two-week free trial period allows you to evaluate whether it is useful for you.
If you are a seasoned AI user or vibe coder, then you probably know what tools work better for you. Use your favorite ones!
Sitecore MCP Server
Sitecore MCP Server is open-source and hosted on GitHub. You can run it from sources, I will explain it in future articles. But it is also distributed as an NPM package. And it is the easiest way is to run it.
Configuration
Model Context Protocol servers are configured in the standard way. It is a JSON-based configuration.
Cursor
Cursor allows the configuration of the MCP servers globally for all projects, and locally only for certain projects.
/.cursor/mcp.jsonis the configuration path per project%UserProfile%/.cursor/mcp.jsonis the configuration for global MCP servers on Windows~/.cursor/mcp.jsonis the configuration path for global MCP servers on macOS and Linux- You can open
Cursor Settings > MCP > Add new global MCP Server. It is the quickest way to find the configuration in your system.
I recommend configuring MCP servers per project.
The configuration file should look like this:
{
  "mcpServers": {
    "Sitecore": {
      "type": "stdio",
      "command": "npx",
      "args": ["@antonytm/mcp-sitecore-server@latest"],
      "env": {
        "TRANSPORT": "stdio",
        "GRAPHQL_ENDPOINT": "https://xmcloudcm.localhost/sitecore/api/graph/",
        "GRAPHQL_SCHEMAS": "edge,master,core",
        "GRAPHQL_API_KEY": "{6D3F291E-66A5-4703-887A-D549AF83D859}",
        "GRAPHQL_HEADERS": "",
        "ITEM_SERVICE_DOMAIN": "sitecore",
        "ITEM_SERVICE_USERNAME": "admin",
        "ITEM_SERVICE_PASSWORD": "b",
        "ITEM_SERVICE_SERVER_URL": "https://xmcloudcm.localhost/"
      }
    }
  }
}
This configuration applies to version 0.1.6. Please, make sure to follow the latest configuration once you configure your project.
typestdiotells that the server will use standard input/output for communication between the MCP server and agentcommandnpxtells that the server will runnodepackageargsis the name of the NPM package that we will run. It is@antonytm/mcp-sitecore-server@latestenvcontains environment variables and requires your attentionTRANSPORTconfigures what protocol should be used. It can bestdioorsse. Usestdioby default.GRAPHQL_ENDPOINTconfigures the Sitecore GraphQL Endpoint. Here you should put your endpoint.GRAPHQL_SCHEMASconfigures Sitecore GraphQL schemas that could be used. Theedgeschema is available by default. If you have any other GraphQL schemas, you can add them separated by commas.GRAPHQL_API_KEYconfigures the Sitecore GraphQL API key. You need to put your key here.GRAPHQL_HEADERSconfigures headers that should be passed in the GraphQL requests. Use it if you don’t want to authenticate via API key, as it is passed as a GET parameter. It could be useful for production or the UAT environment. Leave it blank for local and QA environments.ITEM_SERVICE_SERVER_URLconfigures the Sitecore server URL for ItemService. You should put your URL here.ITEM_SERVICE_DOMAINconfigures the Sitecore domain for user authentication. Leave itsitecoreif you have the default Sitecore configuration.ITEM_SERVICE_USERNAMEconfigures the Sitecore user that will be used for ItemService. I recommend that you create your specific user. E.g.,AI, to be able to see changes that were made by AI agents.ITEM_SERVICE_PASSWORDconfigures the Sitecore user password. Please, make sure that you have updated it with the right one.
You can have as many Sitecore MCP servers as you want. You can have local1, local2, qa, etc.
{
  "mcpServers": {
    "Sitecore Local 1": {
	    ...
    },
    "Sitecore Local 2": {
	    ...
    },
    "Sitecore QA": {
	    ...
    },
  }
}
You need to make sure that you ask the AI Agent to work with the required server if you have a few.
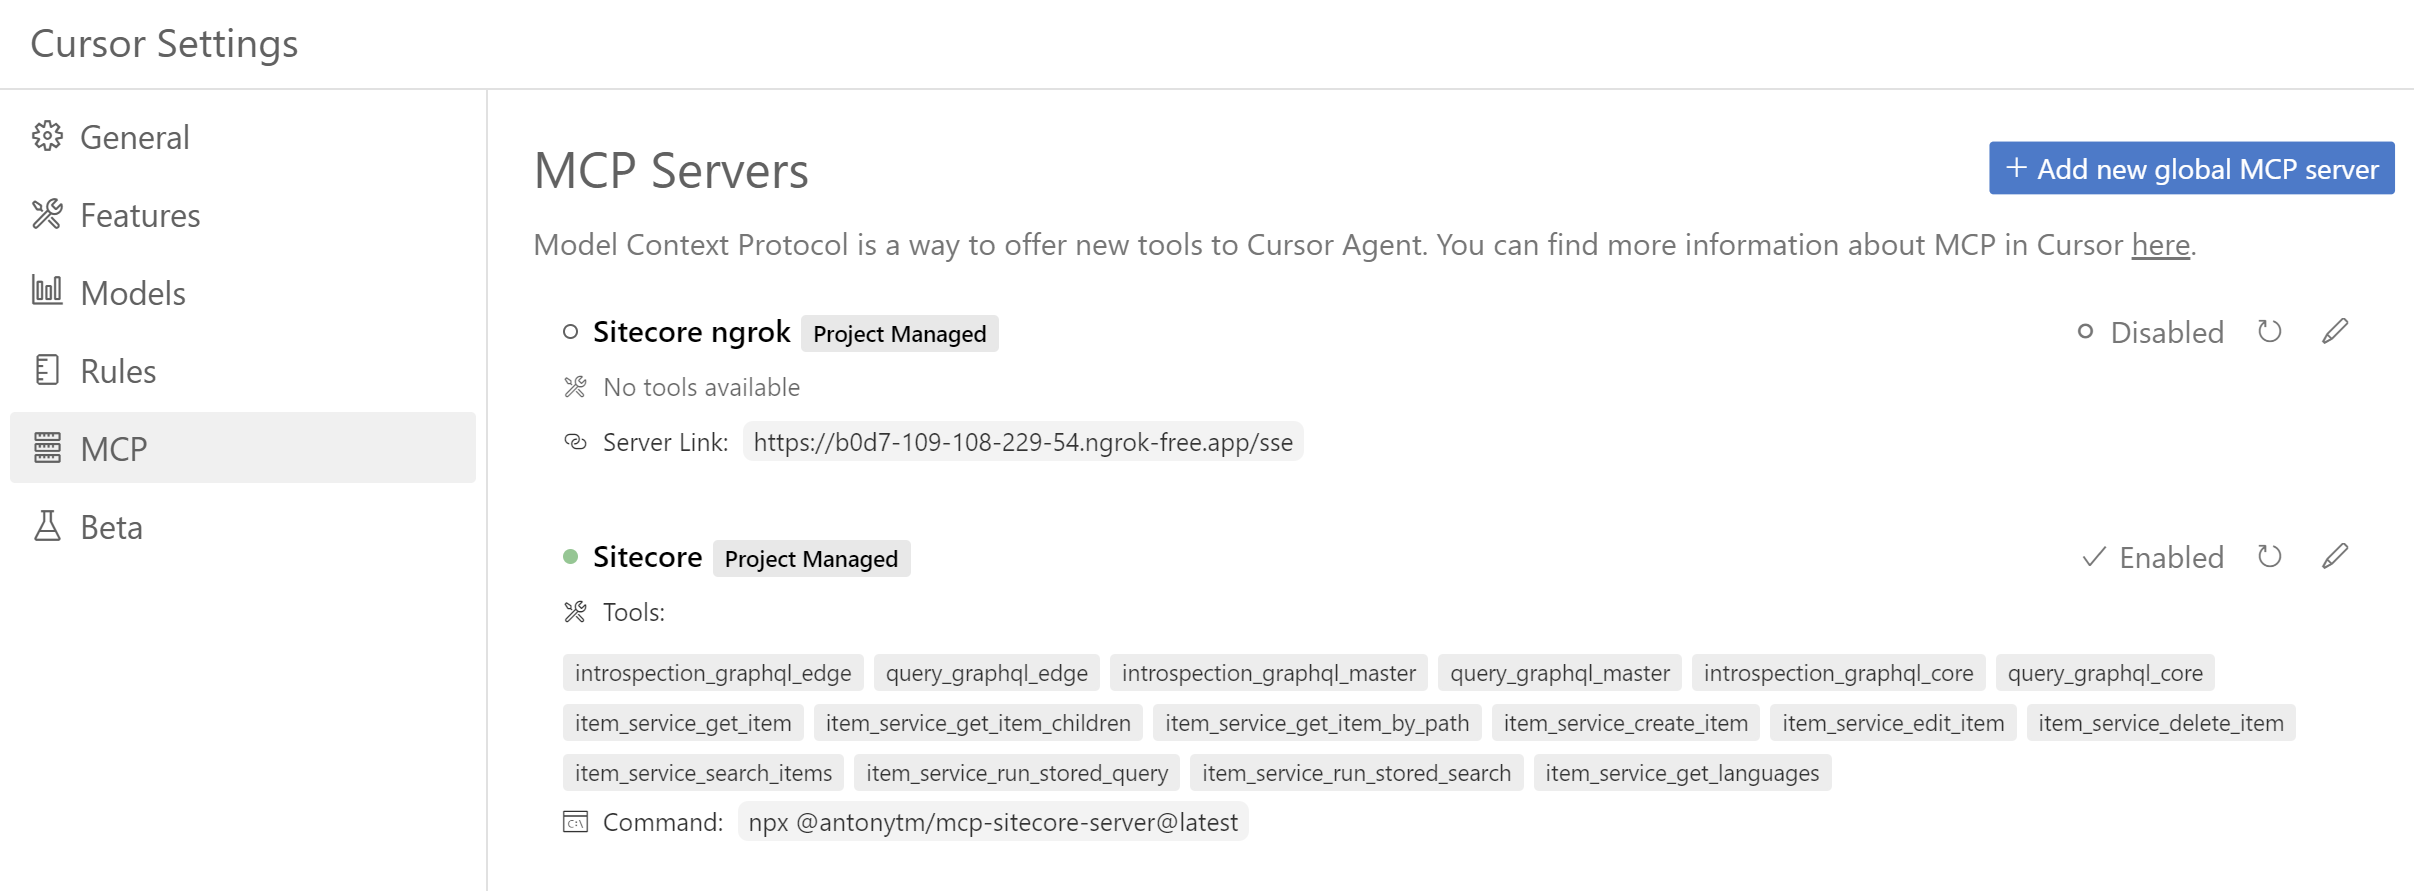
Once you have finished the configuration, you should get the list of tools available from the Sitecore MCP server.
VS Code
VS Code is smart enough to detect the Cursor per project configuration. If you have already configured the MCP server for Cursor, you can do nothing for VS Code.
If you don’t use Cursor, you need to add the Sitecore MCP server to the VS Code configuration.
/.vscode/mcp.jsonis the configuration path per project%UserProfile%/AppData/Roaming/Code/User/settings.jsonis the configuration path for the user on Windows$HOME/Library/Application/Support/Code/User/settings.jsonis the configuration path for the user on macOS- You can use the
MCP List Serversfrom the command palette to add new MCP servers
The configuration file looks very similar to Cursor. The difference is that the top-level JSON property should be servers, not mcpServers, for the project-level configuration file. And if you configure the global MCP Server, you need to wrap it with the mcp property, as settings.json is a common configuration file, not only for MCP.
Claude Desktop
Claude Desktop has the same configuration file format as Cursor. The configuration file could be found:
%UserProfile%/AppData/Roaming/Claude/claude_desktop_config.jsonfor Windows$HOME/Library/Application/Support/Claude/claude_desktop_config.jsonfor macOS
Usage
Now, you are ready to try it in action. Start from something simple to check if the AI Agent sees your MCP server’s tools and can run them.
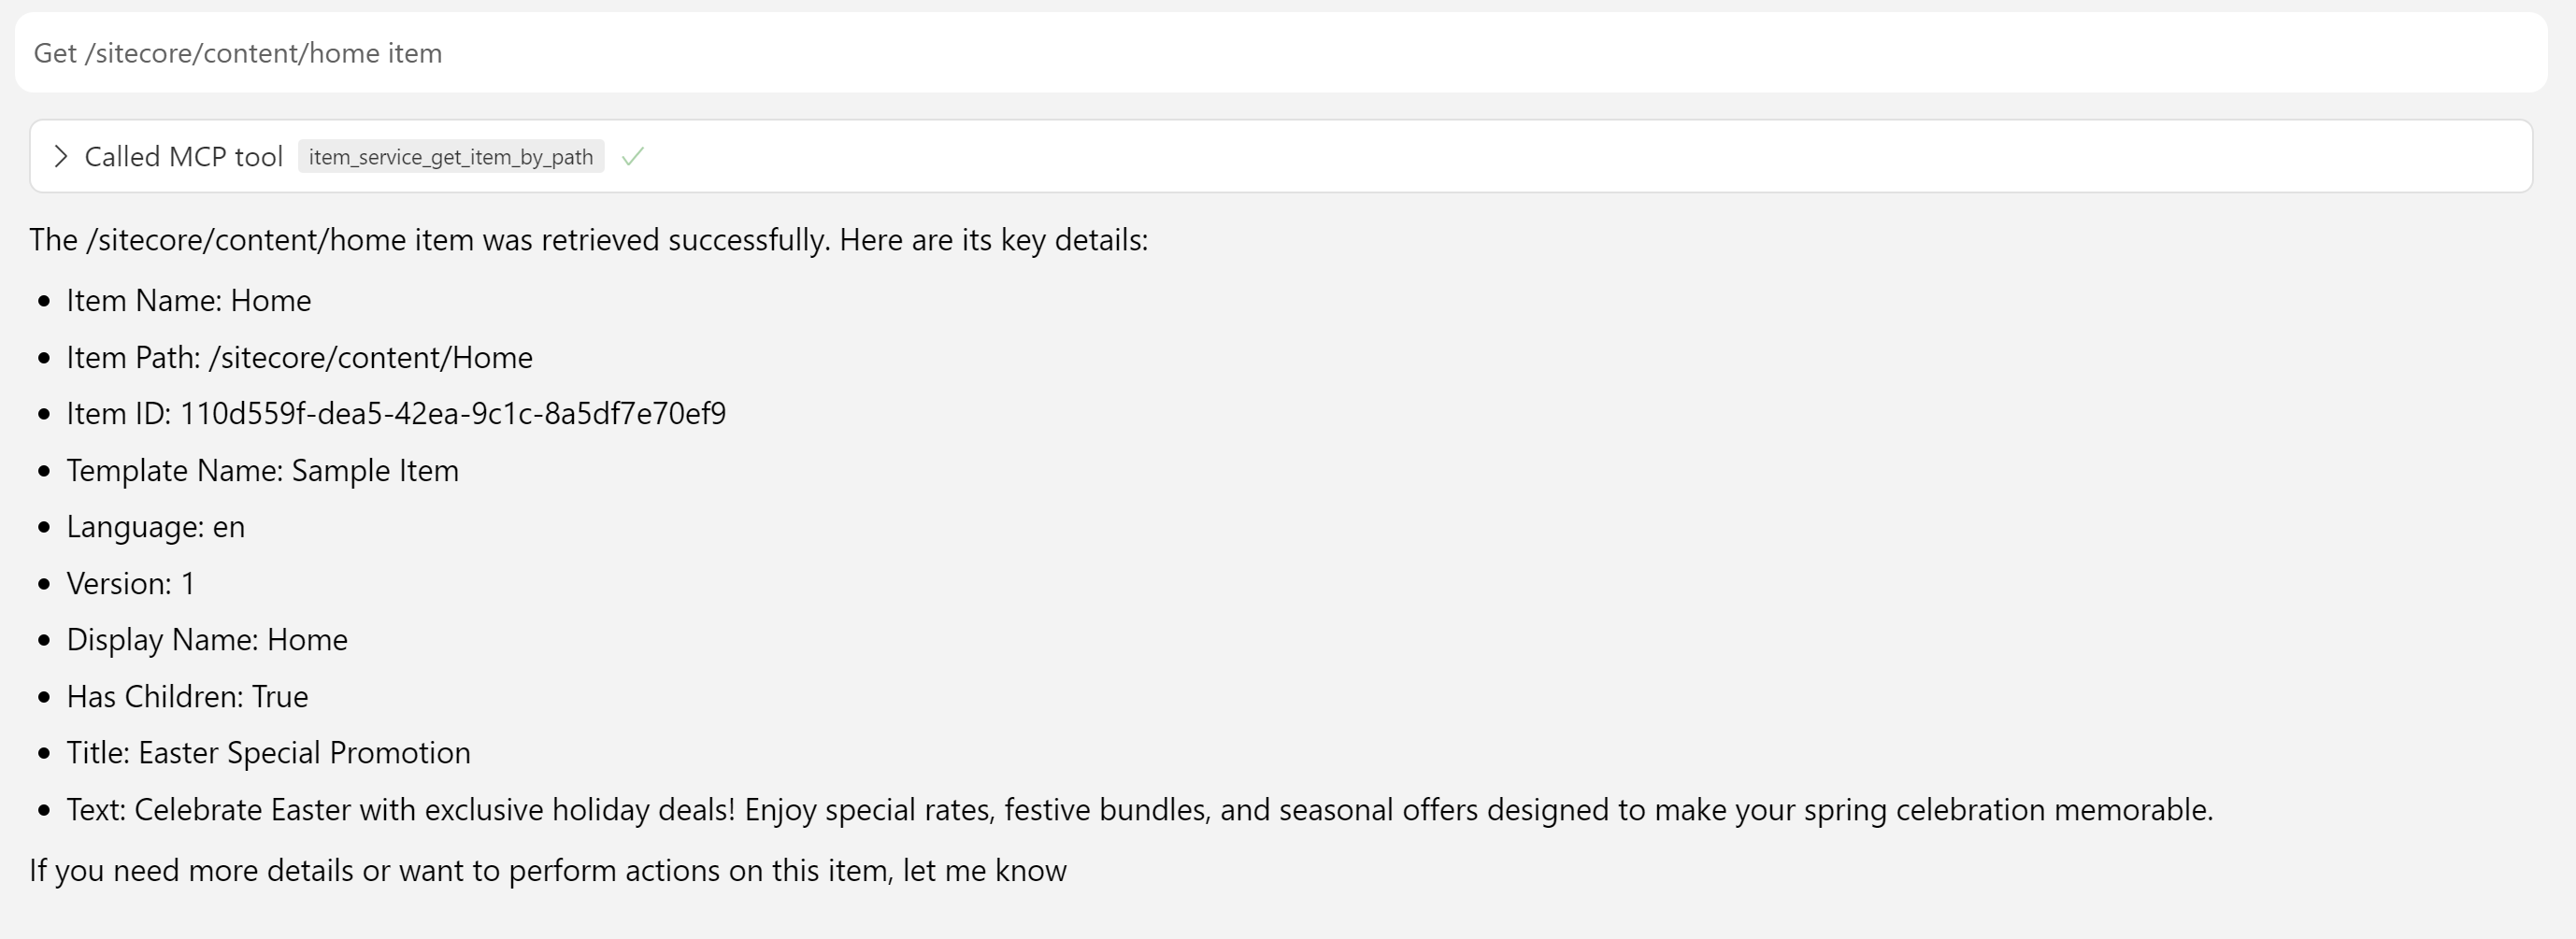
Now you can see that it works, you can do whatever you want, it is all up to your imagination! From what will you start?
Conclusion
Model Context Protocol servers empower AI agents with new capabilities. You can add the ability to work with Sitecore. It will take 5 minutes to install Cursor(or Claude Desktop or VS Code), 5 minutes to configure the Sitecore MCP server, and you are ready to go. You can experiment with it.
Now the content editors can do their day-to-day work quickly. They can focus on content and leave chore operations to AI. The developers can easily troubleshoot the bugs, speed up bulk operations. It can make work of everyone easier. I believe in it!
Please, try it and leave me feedback. What does work well? What does not work? What could be better? What tools are missing?